Introduction to the RSP Notebook Aspect
Most RSP users will find Jupyter Notebooks to be the most efficient and powerful way to interact with the DP0.1 data set. For DP0.1, Jupyter Notebooks will be the primary way to access images.
Always save and shutdown all notebooks and log out of JupyterLab when you are done your day’s work. This is important to preserve resources for other users and to ensure you re-enter the RSP in a known state every time.
How to log in, navigate, and log out of JupyterLab
From the RSP landing page at data.lsst.cloud click on the central panel for Notebooks.
Software Version and Server Size: The first page offers a choice of software environment version (left) and server size (right), as shown in the next figure. Most users will choose the recommended software version and a medium server size.
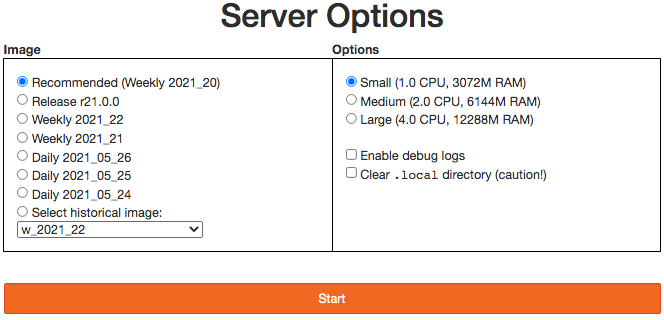
Most users will choose the recommended software version and a medium size.
The term “image” atop the left box refers to a “Docker image” that defines the software packages and their versions which will be automatically loaded in the server environment. The “recommended” image will be updated on a monthly basis during DP0.1 to encourage users to adapt to using software that is in active development, and to benefit from the bug fixes and updates made by Rubin Observatory staff. Older images will remain accessible to users.
RSP users who are doing a lot of image processing might need to select a large server, and those who are working with small subsets of catalog data can use a small server.
Start the Server: Pressing the orange “Start” button to start the server returns this page with a blue progress bar:

Be patient. Sometimes it takes a couple of minutes to start a server.
Navigating the JupyterLab Interface: The JupyterLab landing page in the figure below is the launch pad for all JupyterLab functionality (e.g., Notebook, Terminal). Return to this launch pad at any time by clicking the plus symbol at upper-left. For DP0.1, most users will prefer using the Notebook or Terminal, but there is also a Python console available. In order to duplicate catalog queries executed in the Portal, re-execute the query using the TAP client available in the Notebook.
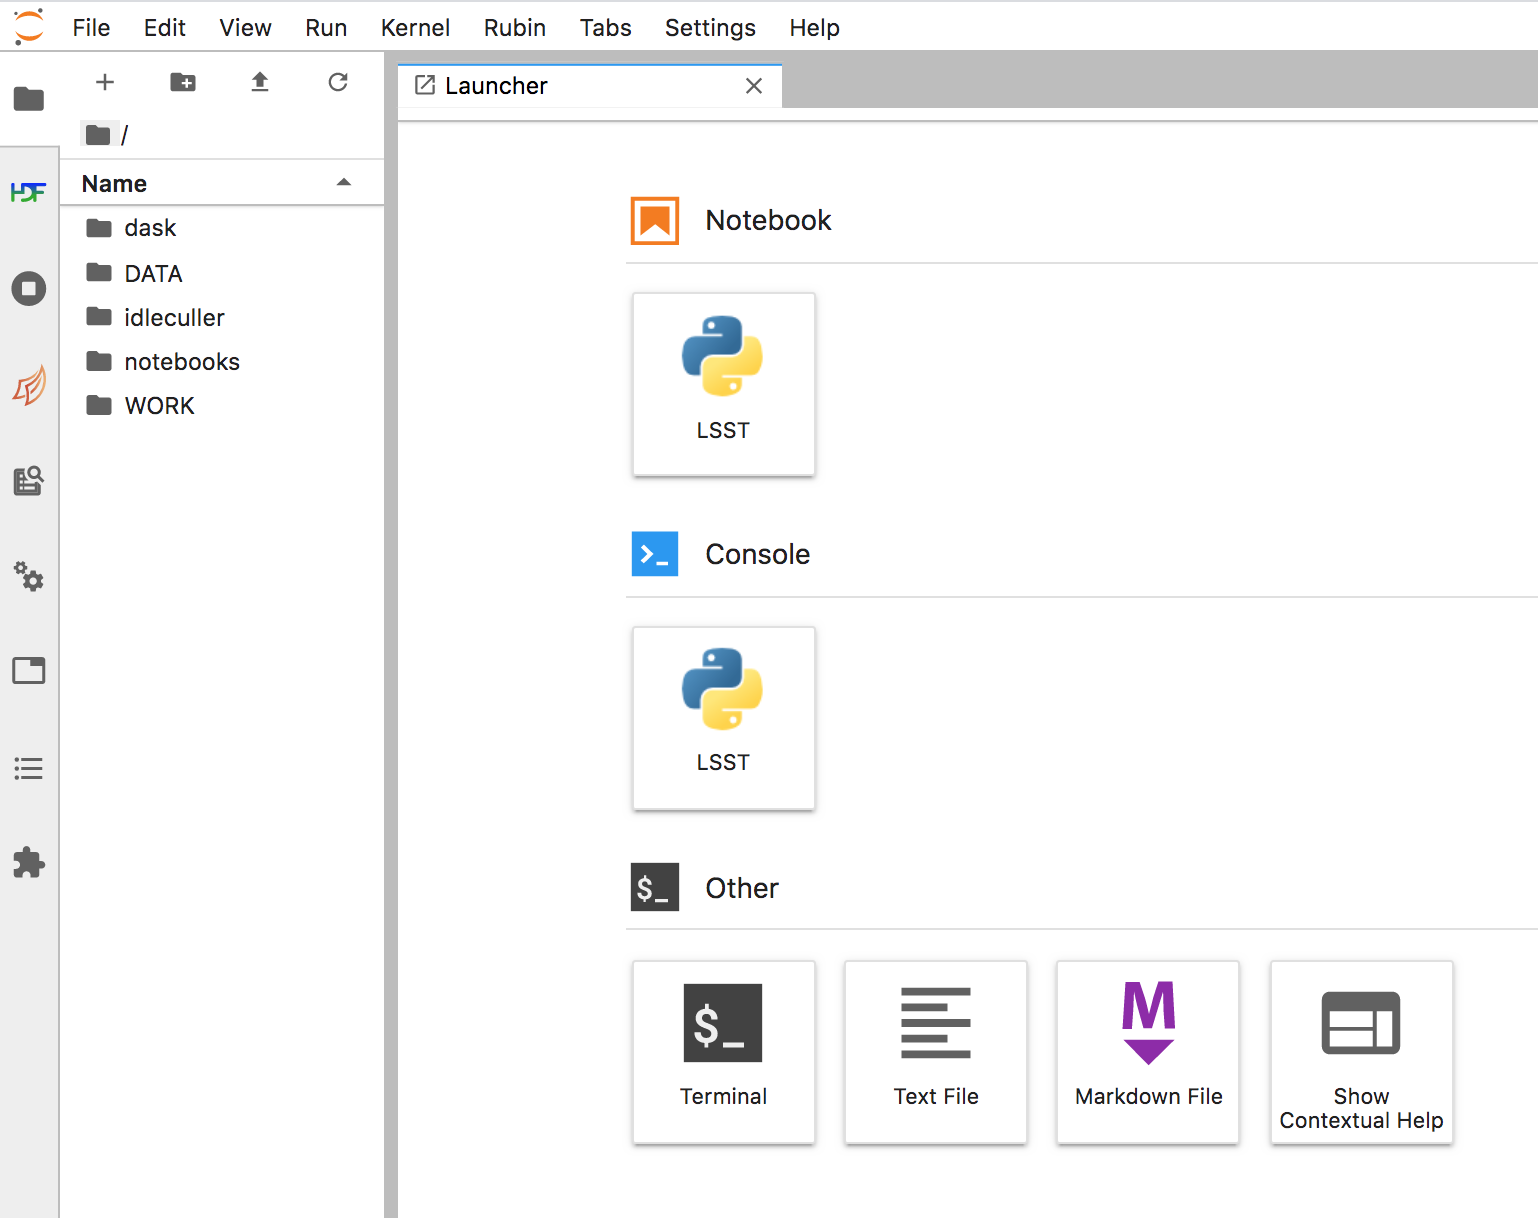
The JupyterLab landing page from which several tools can be launched and the file system can be browsed (left sidebar).
In the very left-most vertical sidebar of icons, the top icon is a file folder, and that is the default view.
The left sidebar lists folders in the user’s home directory (e.g., DATA, WORK, and notebooks).
Launching a terminal (the default is a linux bash terminal) and using the command ls will return the same list.
Navigate the file system and open files by double-clicking on folders and files in the left sidebar.
Although the file browser is a handy way to navigate your user home space, it does not allow you to navigate to, e.g., the shared data space. One way to make other spaces available in the file browser is to create a symbolic link using the Terminal to the desired space somewhere in your home directory.
Jupyter Notebooks can be identified by their file extension .ipynb.
All users will find a set of tutorial notebooks provided in the “notebooks/” directory.
Safely Log Out of JupyterLab: Use the “File” menu in the top menu bar. To safely shut down a Notebook, choose “Close and Shutdown Notebook”. To safely shut down a JupyterLab server and log out of the RSP, choose “Save all, Exit, and Log Out”. It is recommended you log out every time you are finished with a session in order to both preserve resources for other users and to ensure you re-enter the RSP in a known state every time.
How to use the JupyterLab terminal
The DP0.1 data sets and the LSST Science Pipelines tools can both be accessed from the command line of a JupyterLab terminal tab. A terminal session can be started by clicking on the terminal icon in the Jupyterlab launch pad. As described in the default message that appears in all newly-launched terminals, to create a Rubin Observatory environment in a JupyterLab terminal session and set up the full set of packages, users must first execute:
source ${LOADSTACK}
setup lsst_distrib
For example, to query and retrieve DP0.1 data sets using the Butler (see below), command-line tools are available as documented here.
Type butler --help in any terminal to see a list of available butler functionality.
How to use a Jupyter notebook
The best way to learn how to use a Jupyter Notebook is to open the first of the tutorial notebooks which are provided in each user’s home directory,
and also available in the tutorial-notebooks repository in the rubin-dp0 GitHub Organization (see also Jupyter notebook tutorials).
Executing code in a Notebook: Jupyter notebooks provide “cells” within which you type either Python code or markdown language (for formatted text). Choose the cell to execute by clicking in it with your mouse (the cursor must be in the desired cell). Hold down the shift key and press either enter or return (depending on your keyboard type), or click the ‘Play’ button in the notebook toolbar, and the contents of the cell will be executed. If the cell type is code, and the cell contains python code, the code will be executed. If the cell type is markdown, then it will be rendered upon execution to yield nicely formatted text. For some handy markdown tips, see this blog post.
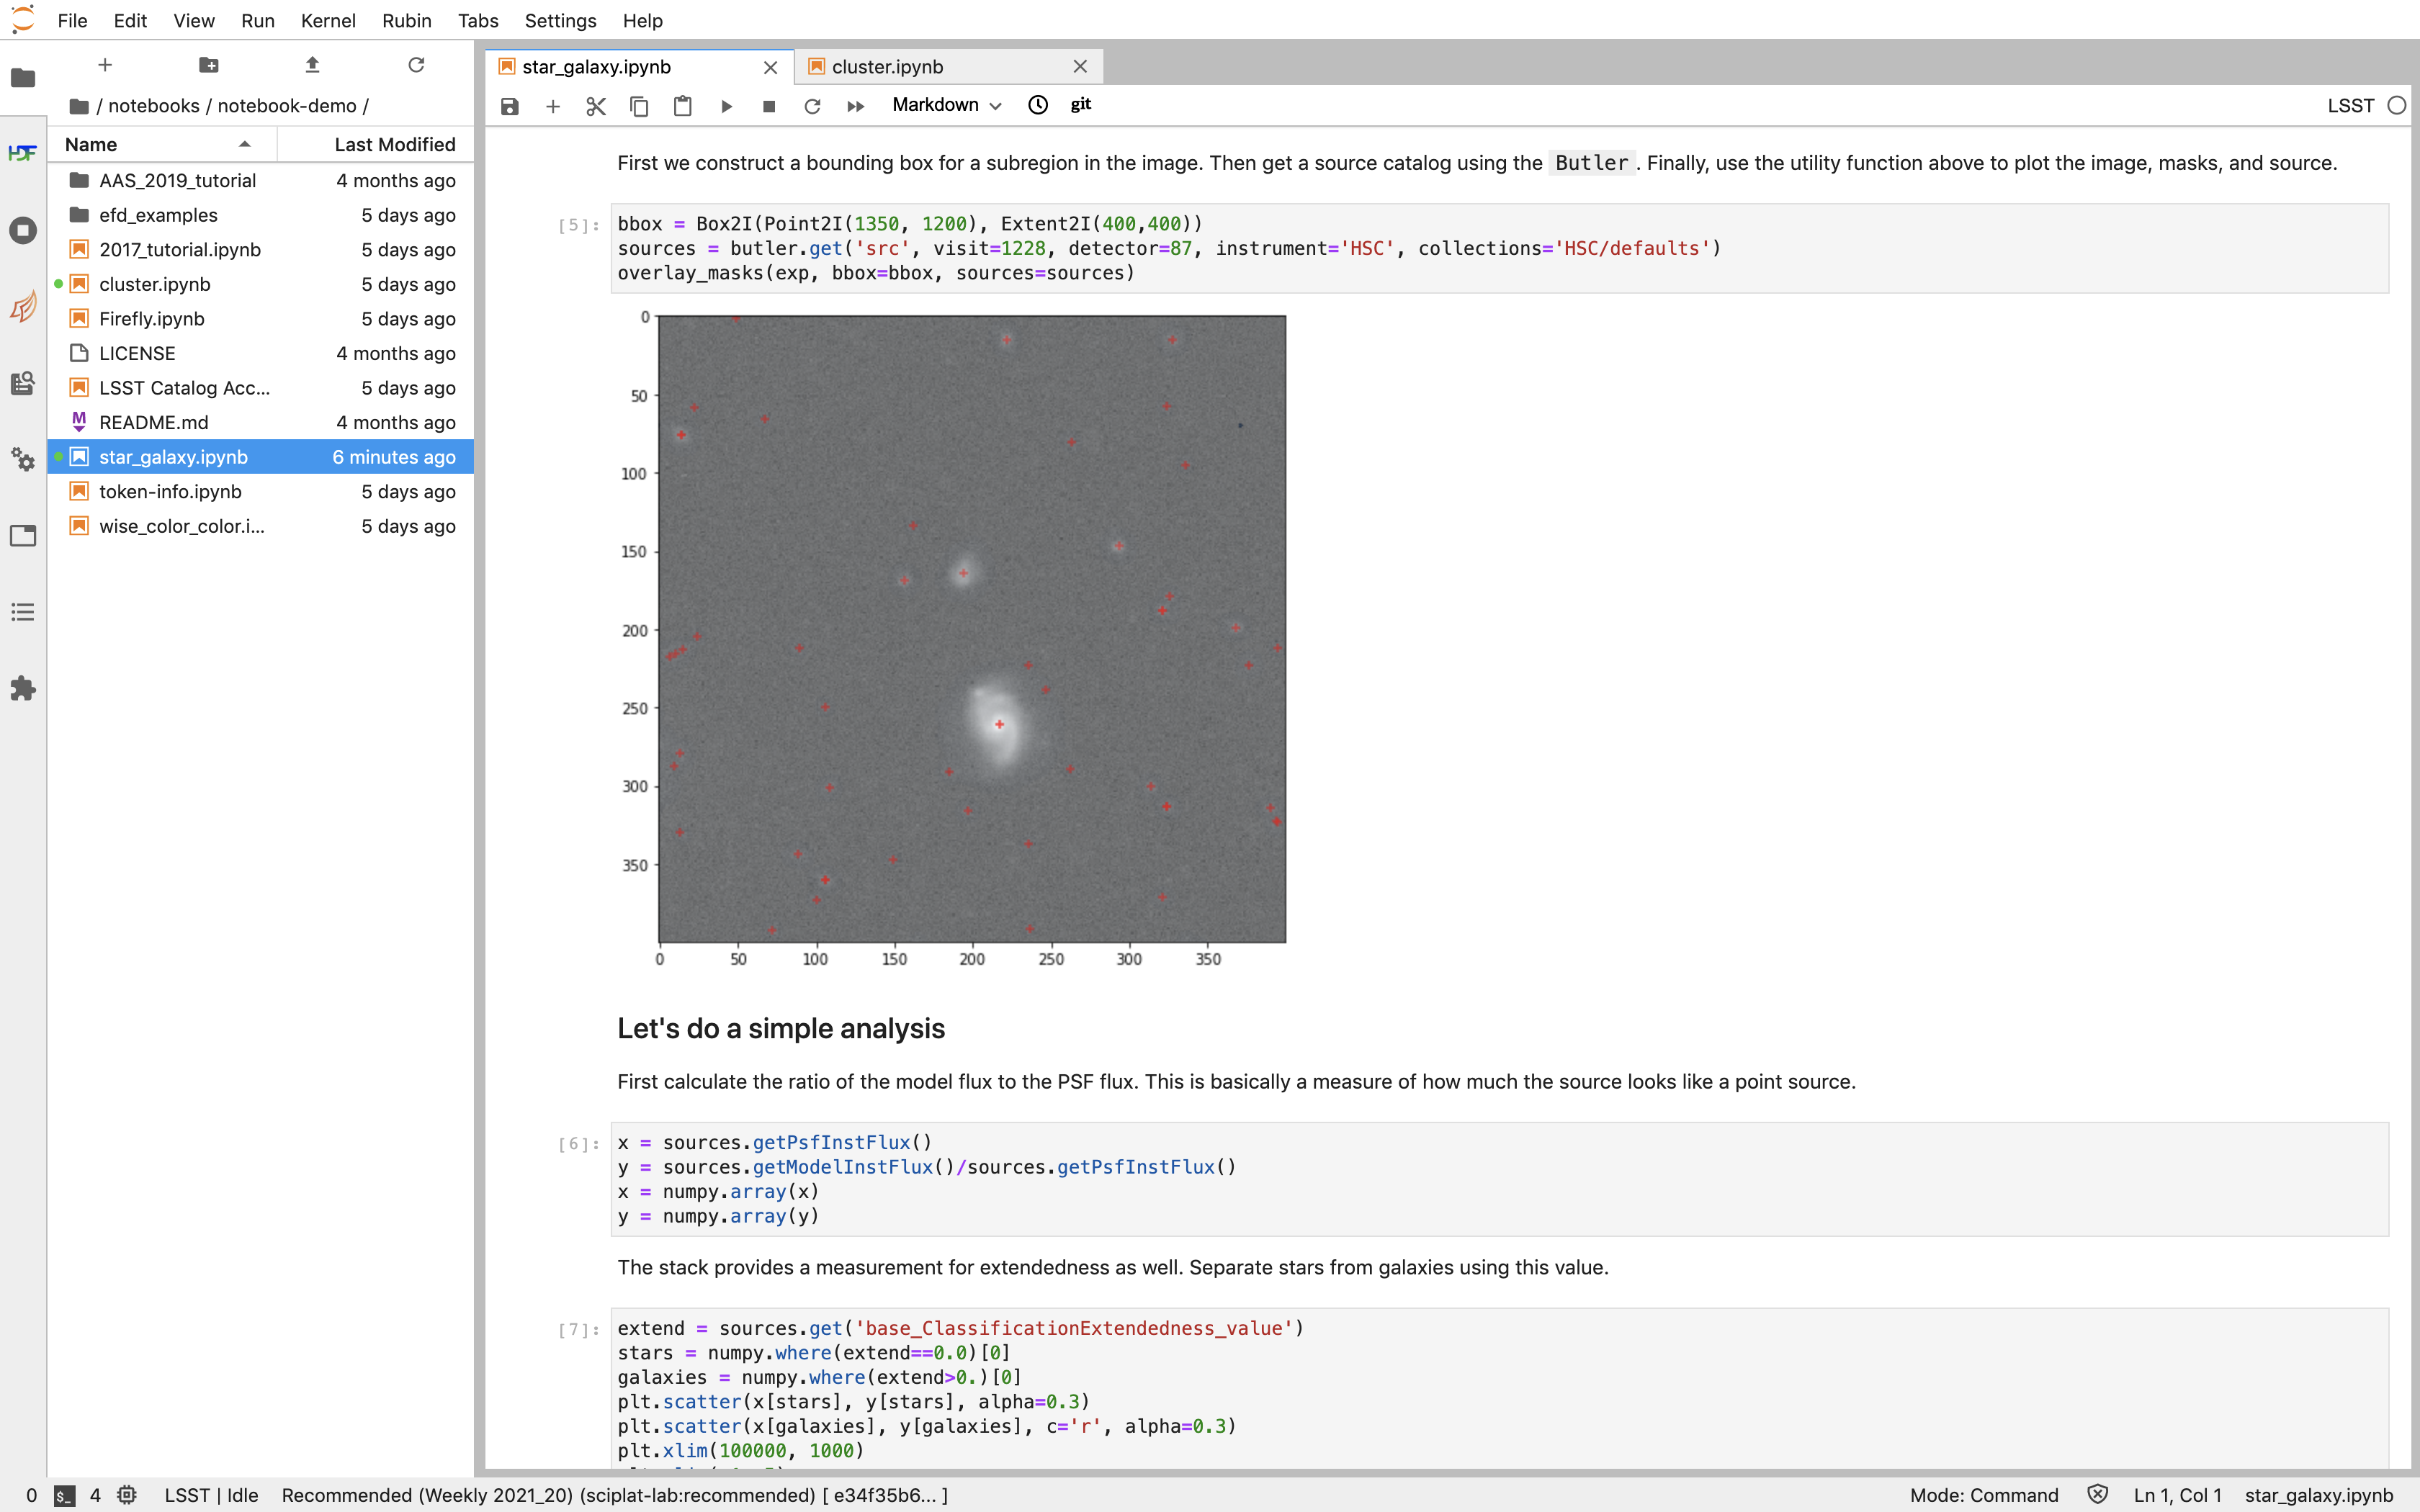
An example of what users see in the Notebook Aspect. The left panel is a file tree from which you can access your personal files, and which will come pre-populated with a handful of tutorial notebooks that users can execute on their own. The largest panel is the Jupyter notebook, where markdown and code can be entered and executed. You can also see that one can have multiple notebooks open in separate tabs.
Opening Multiple Notebooks: You can have multiple notebooks and terminals open in your viewer at a time. This is very handy, but you can also arrange both notebooks and terminals next to or on top of each other by dragging the notebook or terminal around by the top bar. Arranging the windows can be convenient when working in both a terminal and notebook at the same time, or when using another notebook as a reference.
JupyterLab Autosaves Notebooks: Note that JupyterLab autosaves your notebooks at a default rate of 2 minutes.
Jupyter notebook frequently asked questions
What is a kernel?
In the RSP Notebook Aspect, your notebooks will be operating in a kernel that has access to the full Rubin Science Pipelines, including the “Butler” (see below) that will be your main access tool to extract images and catalogs from the DP0.1 data. Many standard Python libraries and modules will be available, and users can install additional Python tools they wish to use.
Is all the code in Python?
Yes, the RSP Notebook Aspect will only have python environments for DP0. To access DP0.1 data from the Notebook Aspect, users will need to use Python commands and code. Much of the LSST Science Pipelines code is in Python, and the DP0 Jupyter notebook tutorials use Python as well. These tutorials contain executable examples of the commands required to access and analyze data. All DP0 delegates should feel free to copy and paste from the provided tutorials. Anyone new to Python and looking to learn more might benefit from this Python for Beginners website (which includes links to tutorial in a variety of languages). Web searches for “python (thing you want to do)” are usually pretty successful too.
What is the Butler?
The Butler is a middleware component of the Data Management System (DMS) for persisting and retrieving datasets from the DP0.1 data repository. The only way to access DP0.1 images is via the Butler from a Jupyter Notebook. The third generation “Gen3” Butler is the version being used for DP0.1. Full Butler documentation is available, and one of the Jupyter notebook tutorials focuses on Butler use as well.
How do I ask more questions about the RSP’s Notebook Aspect?
Keep in mind that if you are not experienced at accessing data via Jupyter notebooks, or using a Science Platform more generally, you are not alone! Most of the DP0 delegates are new to this environment, and all of your questions and feedback will help us improve both the documentation and the tools.
The DP0 Delegate Homepage provides information about Getting support at any time via the Rubin Observatory Community Forum or via GitHub Issues. Another option is to attend the biweekly DP0 Delegate assemblies which will feature live tutorials and question-and-answer time with Rubin Observatory staff.
Beginner-level questions are very welcome, both in the Community Forum and during the Delegate Assemblies. To encourage questions in the Forum, a couple of beginner-level topics have been started to share resources for learning python and SQL. People new to the Rubin Community Forum might appreciate this video demonstrating how to navigate and post topics to the forum.
Troubleshooting tips
How to recover from package import errors (ImportError)
The Problem: In this case the problem manifests when a package cannot be properly imported.
This leads to an ImportError for which the last line of the traceback actually points to the file it is trying to import from, and it is in the users .local directory.
If a user sees a mention of .local anywhere in the exception, there is a chance they have installed packages that are polluting stack environments, and this is a big red flag that following the solution below will be necessary.
However, this is not the only way this problem can manifest, as issues with user-installed packages can be hard to track down. E.g., it might import fine, but then not be able to find an attribute or method on a particular object.
The Solution: Users should exit the RSP and then clear their .local file when they log back in to the Notebook Aspect by checking the box “Clear .local directory (caution!)”
on the Hub spawner page (see the “Server Options” image at the top of this page).
This option is simple and effective, and also helps in cases where the user-installed packages are keeping JupyterLab from starting.
An Alternative Solution: The user should first close and shutdown the notebook (or, e.g., ipython session) which is experiencing the error, and then launch a terminal in the Notebook Aspect
and move their .local file out of the way by renaming it as something else, such as:
mv ~/.local ~/.local_[YYYY][MM][DD]
There will be no need to recreate the .local directory after this.
The user should then restart the notebook (or, e.g., ipython session) and try to import the packages.
What to do if DP0.1 Tutorial Notebooks Do Not Automatically Update
New versions of the tutorial notebooks will be periodically released by the Community Engagement Team (CET).
The contents of your notebooks/tutorial-notebooks/ directory should automatically update when a new version of a tutorial notebook is released.
There are several reasons why this might not occur, and, correspondingly, several ways for you to update the contents of your notebooks/tutorial-notebooks/ directory.
All of the options below require that you first configure git for your GitHub account using the terminal in the RSP Notebook Aspect.
First, check whether your GitHub user name and email are configured correctly in the .gitconfig file in your home directory.
To do this, use the following command in the terminal window of the RSP Notebook Aspect:
egrep 'email|name' ~/.gitconfig
If nothing is returned, then your GitHub email and user name have not been set up. You may set them up by typing in the following commands (remember to use the same GitHub account information you use to access the RSP):
git config --global user.email yourEmail@yourdomain
git config --global user.name GItUsername
From here, you have three options to update the contents of your notebooks/tutorial-notebooks/ directory.
Option 1 (if you have not saved changed versions of the notebooks) - Fully log out, stop the server, and log back in again.
This will automatically refresh the contents of your notebooks/tutorial-notebooks/ directory.
To fully stop your server, use the control panel at https://data.lsst.cloud/nb/hub/home>.
Click the red button that says “Stop My Server”.
Option 2 (if you have saved changed versions of the notebooks that you want to keep) - The first option, above, will not result in you having the most up-to-date versions of all the notebooks if you have made and saved changes to any of the notebooks.
To check if files have been modified, use this command from a terminal in the notebooks/tutorial-notebooks/ directory.
git status
If it says in red text, e.g., both modified: 01_Intro_to_DP0_Notebooks.ipynb, then changes have been made to this file (recall that executing the notebook counts as making changes,
and note that Jupyter auto-saves changes on a ~2 minute cadence), but Rubin Observatory staff have also updated it (e.g., bug fixes).
Since the file has been twice modified, git has gone ahead and annotated file with all the conflicting lines between the two versions.
This essentially ruins a ipynb file’s functionality (but it is a very useful built-in git feature for, e.g., ascii and code files).
A git-annotated ipynb file might not even load or run for you anymore.
Do a git diff 01_Intro_to_DP0_Notebooks.ipynb and all the differences will be listed.
Use the following commands in the terminal window to restore the version in which you made changes (this takes it out of ‘staged’ status and will avoid future errors), copy your version into a different directory and rename it, and then restore the new version of the notebook that was updated by Rubin Observatory staff.
git restore --staged 01_Intro_to_DP0_Notebooks.ipynb
cp 01_Intro_to_DP0_Notebooks.ipynb ~/my-notebooks/01_my_version.ipynb
git restore 01_Intro_to_DP0_Notebooks.ipynb
Now your notebooks/tutorial-notebooks directory only contains the most up-to-date versions of the tutorial notebooks, with none of your changes.
Option 3 (if you don’t care about keeping changed versions of the notebooks) - To get a completely new version of all the tutorial notebooks in your notebooks/tutorial-notebooks/ directory, use the following commands:
git reset --hard origin/prod
git pull
Using any of the above options is the preferred method to update your tutorial notebooks, but as a last resort, you can delete the entire tutorial-notebooks directory, log out and stop the server, and then log back in again.
Additional RSP notebook documentation
Additional documentation for the RSP Notebook Aspect is available at nb.lsst.io.